
Project Container: Bulk Editor and File Import
FREQUENTLY ASKED QUESTIONS
Find answers to frequently asked questions about Project Container’s new Bulk Editor and File Import tools including where to find them, their use cases, and how to take advantage of their features.

Bulk Editor
- What is Bulk Editor?
- Where Can I Find Bulk Editor?
- Who Has Access to Bulk Editor?
- What Features Does Bulk Editor Have?
- How Do I Use Bulk Editor?
- Where Can I Submit Feedback or Ideas for Bulk Editor?

File Import
- What is File Import?
- Where Can I Find File Import?
- Who Has Access to File Import?
- How Do I Use File Import?
- Where Can I Submit Feedback or Ideas for File Import?
1a. What is Bulk Editor?
A: Bulk Editor is a new feature in Project Container that allows users to bulk update their projects Phase, PESCO Sales Process and Project Status fields. Previously, users could only update their projects’ fields by opening and saving each project one by one.
While the initial launch of Bulk Editor allows for mass updating Phase, PESCO Sales Process and Project Status fields only, we plan to expand the capability to many more fields in the future.
2a. Where Can I Find Bulk Editor?
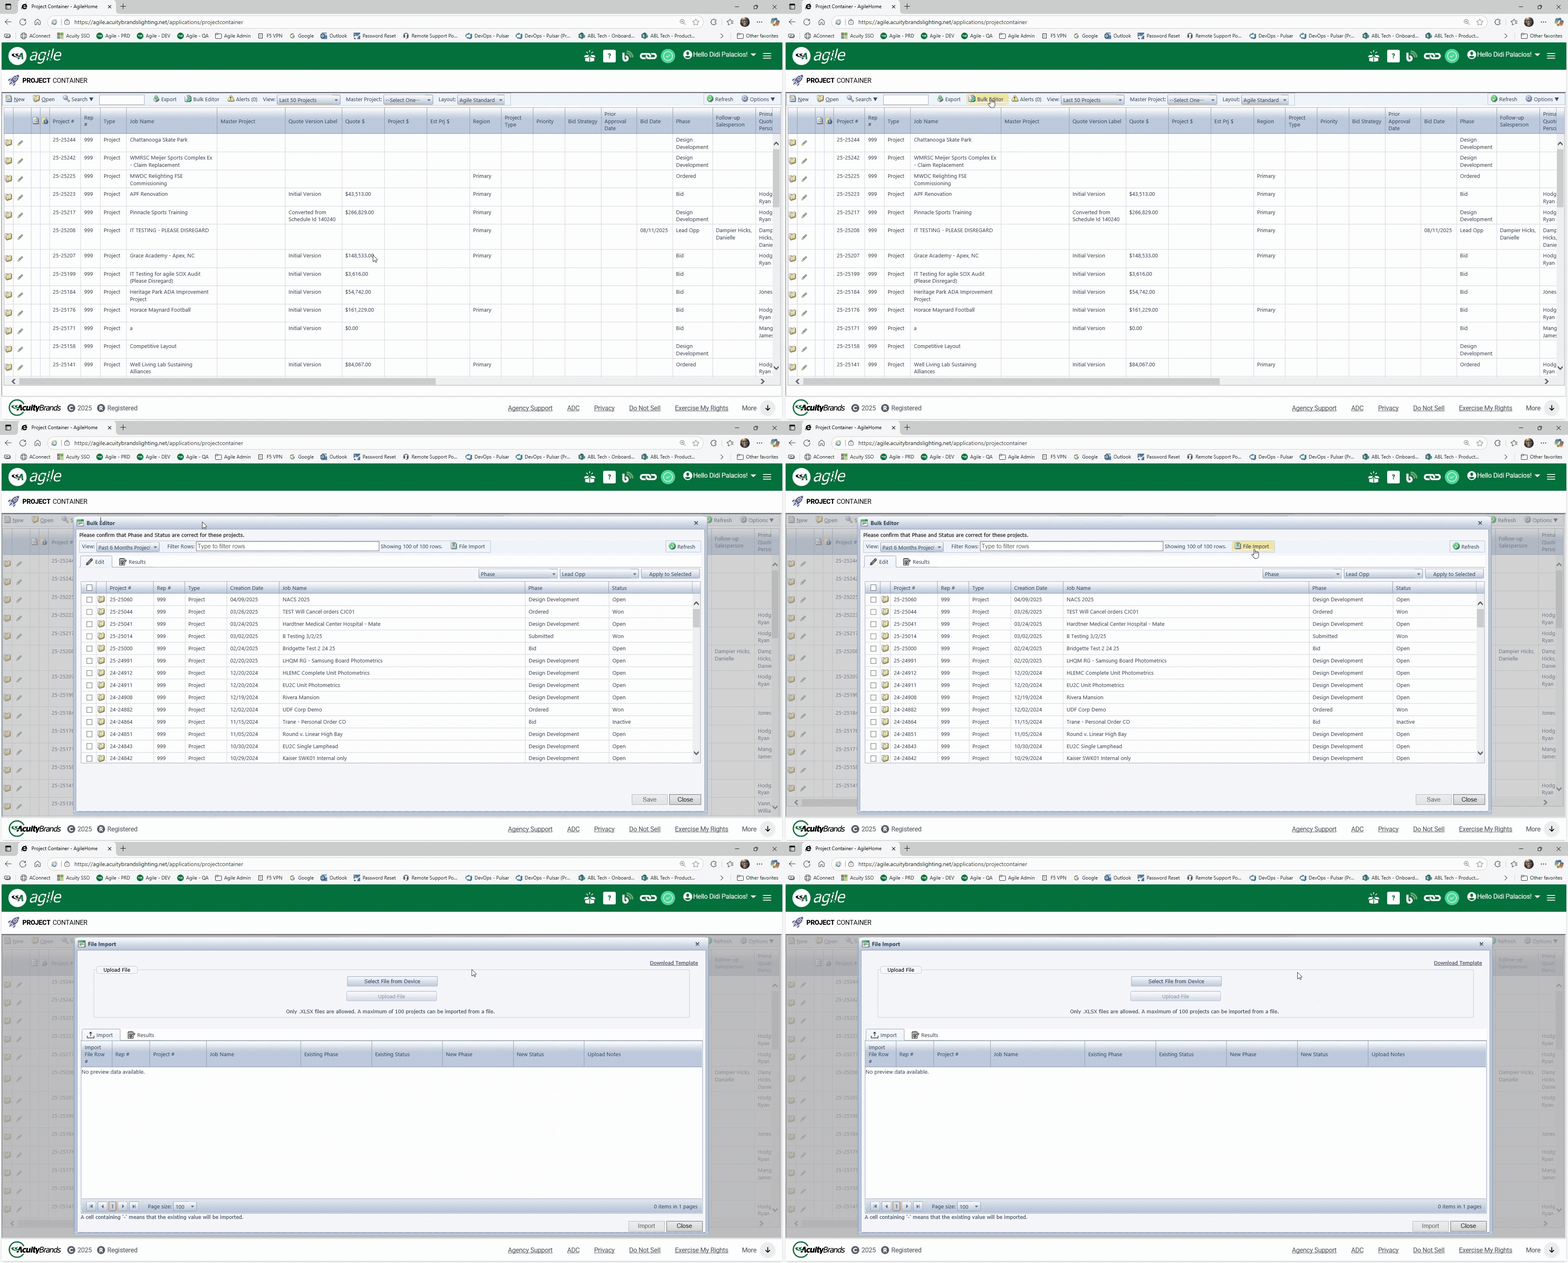
A: Navigate to Project Container in agile. From Project Container’s dashboard, click the button on the top header labeled Bulk Editor.

3a. Who Has Access to Bulk Editor?
A: Currently, Bulk Editor is accessible to Independent Agents (Commercial & Industrial Agency persona in agile) and Acuity’s Direct Sales Reps (Holophane persona in agile).
4a. What Features Does Bulk Editor Have?
A: Below is a breakdown of Bulk Editor’s features:
I. View
Bulk Editor’s View dropdown contains all of your Project Container views, even the custom ones you create!
Bulk Editor also syncs with Project Container in real-time, so when you create a view in Project Container, it will be immediately available in Bulk Editor.
By default, Bulk Editor displays active projects from your agency that have not had their Phase, PESCO Sales Process or Project Status updated in 6 months or longer.
Please note that currently, Bulk Editor can display a maximum of 100 projects.
II. Permissions
Bulk Editor will only display projects that are created by your agency.
There is one exception to this rule, which is Spec Registration projects. Users can view Spec Registration projects that originate from other agencies, but cannot update these projects.
Holophane Subscriptions
Holophane users can update projects they have read/write subscription access to, but they cannot update projects they have read only subscription access to
Holophane Multi-Man Territory
Holophane users can update projects created by a rep number that shares a territory with their rep number
III. Filter
Use the Filter to find specific projects quickly. The Filter responds in real-time, so as you enter or delete characters, your filter results will adjust accordingly.
The Filter will search across all projects and fields visible in Bulk Editor.
The indicator to the right of the Filter will display the number of visible rows (i.e., “Showing 50 of 100 rows.”)
Click the “X” on the right corner of the Filter to clear the field.
IV. Edit Tab
By default, Bulk Editor displays the Edit tab. The Edit tab is where you can edit multiple projects at once. Under the Edit tab, there are seven columns:
- Project #
- Rep #
- Type
- Creation Date
- Job Name
- Phase (or PESCO Sales Process if Holophane)
- Project Status
 HINT: You can sort the columns by ascending or descending order by clicking on the column name.
Please note that currently:
- Only Phase, PESCO Sales Process and Project Status are editable in Bulk Editor.
- Bulk Editor can display a maximum of 100 projects.
Step 1: Load Projects into Bulk Editor
To get started, you will first want to make sure that the projects you want to update are visible in Bulk Editor’s Edit tab. Do this by using Bulk Editor’s View dropdown.
HINT: Use Project Container’s Project Search to identify the projects you would like to update, then save the search as a view. Launch Bulk Editor and click on the view you just created from the View dropdown.
Step 2: Select Projects to Update
From the Edit tab, select the projects to update by either:
- Clicking the Select All checkbox, or
- Clicking the individual checkboxes for each project, or
- Dragging your cursor to highlight the desired projects
Step 3: Apply Changes
At the top right corner, select either Phase, PESCO Sales Process or Project Status from the first dropdown menu, depending on which one you would like to update first. Notice that as you alternate between selecting Phase, PESCO Sales Process or Project Status, the second dropdown menu displays the corresponding values for the selected field.
Next, select the desired value from the second dropdown menu and click Apply to Selected. Your highlighted projects should now reflect the change you just applied.
HINT: Notice the black box around your project. This visual indicator means that a change was detected.
If you applied a change to a project in error, you can revert the change by either:
- selecting the original value from the dropdown and applying it to the project, or
- closing Bulk Editor (without saving) and reopening
Step 4: Save Changes
Lastly, click the Save button to commit your changes. Visit the Results tab to confirm that your save attempt was successful.
V. Results Tab
The Results tab displays important information about your save attempt. Similar to the Edit tab, all fields in the Results tab are read-only.
If your attempt to save a project was unsuccessful, then under the Result column, the reason will be highlighted in red.
Successfully saved projects will simply say, “Saved successfully” under the Result column.
A project can fail to save for any of the following reasons:
- Project is currently open on another user’s machine.
- User does not have permission to update the project (i.e., the project originated outside of the user’s agency).

Once a project is saved, the changes are recorded in the project’s Audit Log.
VI. Refresh Tab
Click the Refresh button on the top right corner to refresh the content on the current page. This can be helpful for loading new projects that meet the requirements of the current view since the last time Bulk Editor was opened.
5a. Where Can I Submit Feedback or Ideas for Bulk Editor?
A: Share your feedback or ideas for Bulk Editor using this Feedback Form! You can submit the form more than once, so feel free to share as much feedback as you’d like.
File Import
1b. What is File Import?
A: File Import is an addon for Project Container’s Bulk Editor that gives users the ability to bulk update their projects’ Phase, PESCO Sales Process and Status fields by uploading an Excel file.
2b. Where Can I Find File Import?
A: File Import is located inside Bulk Editor.
1. Navigate to Project Container in agile. From Project Container’s dashboard, click the button at the top labeled Bulk Editor.
2. Once Bulk Editor opens, click on the File Import button located to the right of the “Filter Rows” field at the top.
3b. Who Has Access to File Import?
A: Like Bulk Editor, File Import is currently accessible to Independent Agents (Commercial & Industrial Agency persona in agile) and Acuity’s Direct Sales Reps (Holophane persona in agile).
4b. How Do I Use File Import?
A: With File Import, you can bulk update your projects’ Phase, PESCO Sales Process and Status fields by uploading an Excel file. Detailed steps are included below.
Please note that currently:
- Only Phase, PESCO Sales Process and Project Status can be updated using File Import.
- File Import can update a maximum of 100 projects at a time.
Step 1: Open the Template File
To get started, you will first want to download a blank copy of File Import’s Excel template onto your machine. You can find this template by clicking on the link labeled, “Download Template” on the top right corner of File Import’s screen.
Open the template once it has downloaded.

Step 2: Enter Project Details Into Template File
Next, enter the following project details into the template file on the worksheet tab labeled ‘Template‘ and save the file anywhere on your machine. You can also change your template file name if you prefer, but it is not necessary.

- RepNumber: The agency number that the project belongs to
- ProjectNumber: The project number
- (If C&I) NewPhase: The Phase you would like to change the project to
- (If Holophane) NewPESCO: The PESCO Sales Process value you would like to change the project to
- NewStatus: The Project Status you would like to change the project to
Be sure to review the instructions on the worksheet tab labeled ‘Examples’ first.
Step 3: Upload Your Template File to File Import
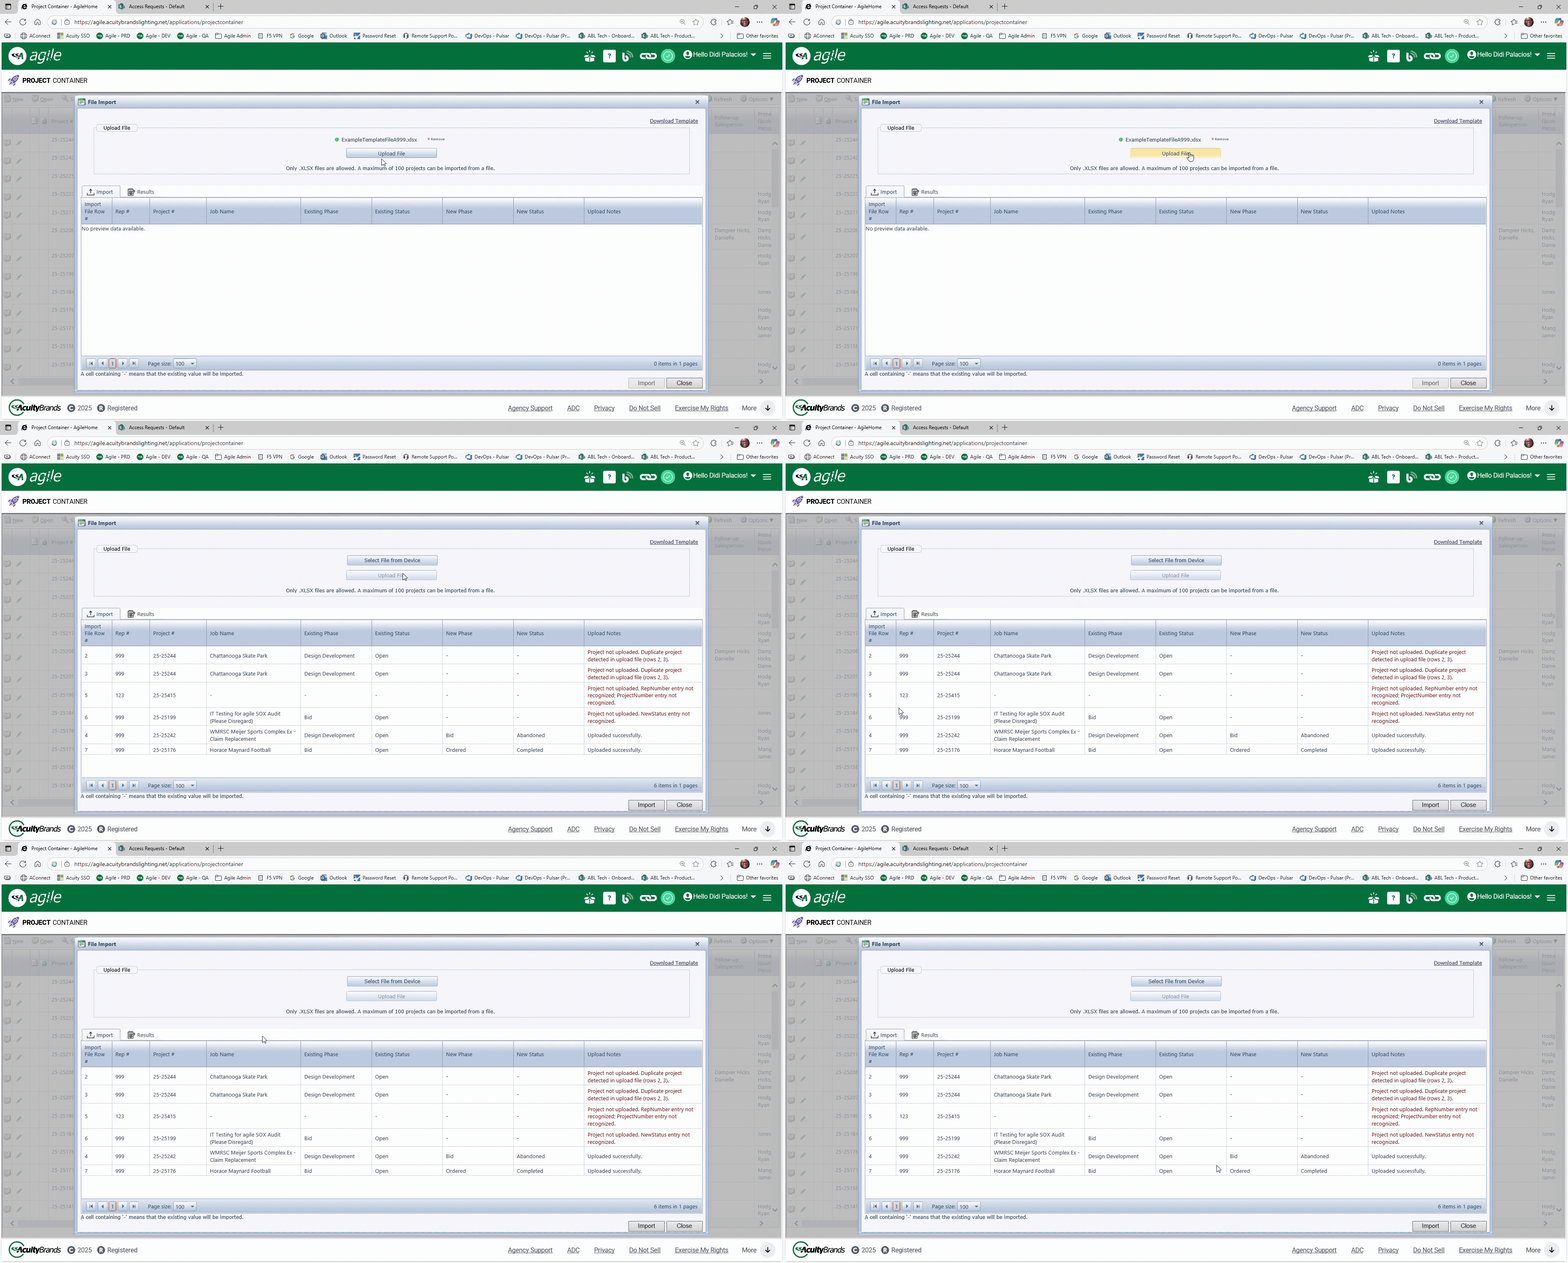
From File Import’s screen, click the button labeled “Select File From Device” and navigate to the template file you filled out and saved in Step 2. Select the file and click “Open”.

Once you click “Open”, you should see the name of your template file with a green circle next to it on File Import’s screen. This means that your file is ready to upload.
Click the “Upload File” button.
Step 4: Review Your Uploaded Projects’ Details on the Import Tab
Upon clicking the “Upload File” button, the projects included in your template file will appear on File Import’s screen (in the table under the Import Tab).
Check the column labeled “Upload Notes” on the right-hand side of the table. If your project uploaded correctly, you will see the comment: “Uploaded successfully.”
If your project did not upload correctly, the “Upload Notes” column will provide an error message next to the project explaining why it failed.
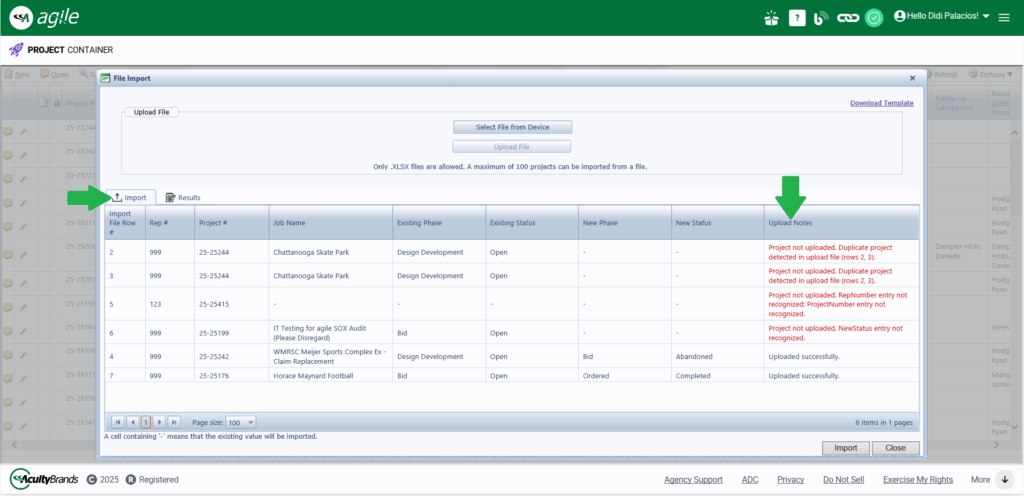
To fix a project that did not upload correctly, go back to your template file in Excel and update the project according to the error message provided in File Import’s “Upload Notes” column. Once finished, save the template file and upload it to File Import again.
Any project that does not upload correctly during this step i.e., the project contains errors in File Import’s “Upload Notes” column, cannot complete the final step below (Step 5, import changes).
HINT: A project can fail to upload into File Import for a few reasons:
1. No changes were detected for the project in your template file. You added a project to your template file, but both the "New Phase" or "New PESCO" and "New Status" fields were left blank.
2. Invalid Phase, PESCO Sales Process or Project Status. You entered an invalid Phase, PESCO Sales Process and/or Project Status value for a project into your template file.3. Invalid Project Number. You entered a invalid Project Number into your template file.
4. Invalid Agency or Rep Number. You entered an invalid Rep Number into your template file. An invalid Rep Number either means that you do not have access to that Rep, or the Rep Number does not exist.
5. Attempted to update a Quick Quote project. You added a Quick Quote project to your template file. Because Quick Quote projects cannot be accessed in Project Container, users cannot use File Import to update Quick Quote projects.
6. Duplicate Project Number. You added the same project to your template file in two or more rows.7. Incorrect template. Required columns are missing or out of order in your uploaded template file.8. Maximum projects reached. You attempted to upload more than 100 projects in your template file. Currently, there is a limit of 100 projects that can be uploaded to File Import at a time.
Step 5: Import Your Uploaded Projects
Lastly, it’s time to import your uploaded projects. Importing will save the changes to your projects according to your uploaded template file.
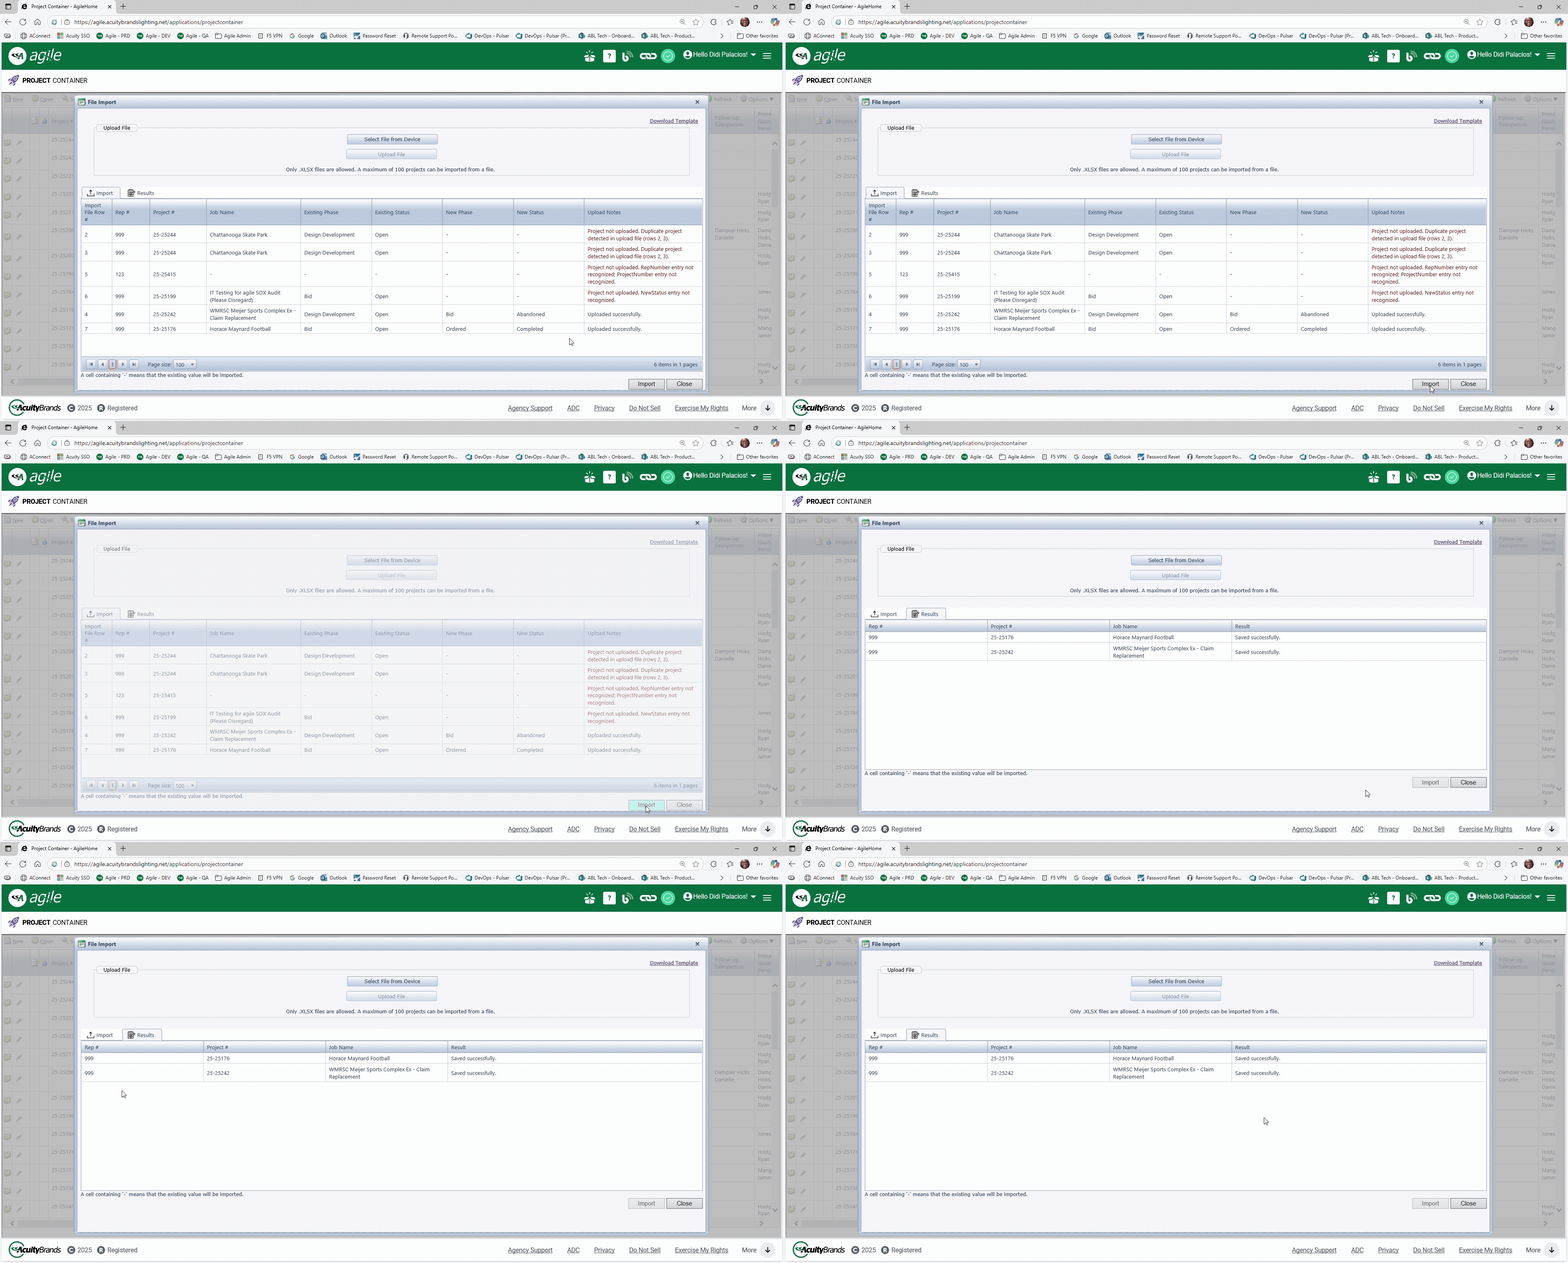
Click the “Import” button at the bottom of File Import’s screen. File Import will now attempt to import any projects that were uploaded successfully in Step 4.
Upon clicking the “Import” button, File Import will switch over to the “Results” tab. This may take up to a minute as the system attempts to save the changes to your projects.
Review the “Results” tab. Check the column labeled “Result” on the right-hand side of the table. If your project imported correctly, you will see the comment: “Saved successfully.”
Notice that in our example video below, only the projects that uploaded successfully in Step 4 were imported in Step 5.
If your project did not import correctly in Step 5, the “Result” column will provide an error message next to the project explaining why it failed.
HINT: A project can fail to import if the project is open on another user's machine. The project must be closed on all machines, or unlocked, in order to be imported successfully.
Please note that the Results Tab will reset itself each time you upload a new template file.
5b. Where Can I Submit Feedback or Ideas for File Import?
A: Share your feedback or ideas for File Import using this Feedback Form! You can submit the form more than once, so feel free to share as much feedback as you’d like.